Webpack
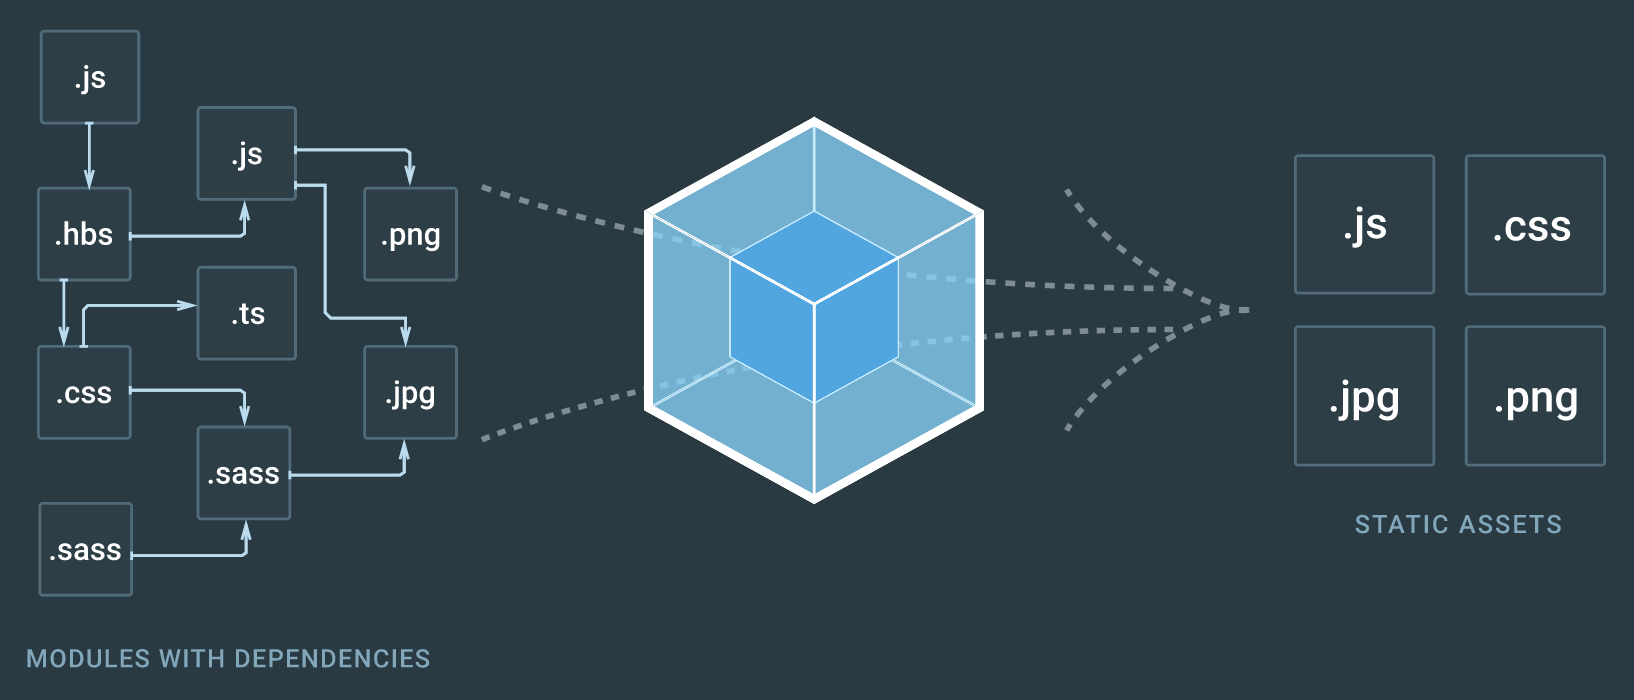
Webpack is a module bundler. It takes our source code and bundles it into a single entry point. This allows us to modularise our code using ES2015 modules while maintaining compatibility in web browsers. It also reduces the number of requests we make to grab our assets from the client-side.
To do this, Webpack takes our source code and passes it through multiple transformations. There are two phases to these transformations: Loaders and Plugins.
Note
We’ll be using Webpack 1.x. Webpack 2.x has been released as of writing but for our needs, they aren’t too different.
Configuring Webpack can seem extremely complicated. You can look at the Project Template to see where we are heading.
Configuring Webpack
To configure Webpack, we need a webpack.config.js file at the root of our project. It looks something like:
|
|
In this configuration we’re defining the following:
target sets the runtime environment of our build.
context sets the base of all our future path references in the config.
entry defines the entry point of our bundles. In this case main is our only bundle and index.jsx is the source file.
output defines where to output our build and where to place the bundles. [name] refers to the entry name, i.e. main. [chunkhash] is an MD5 hash of the bundle’s content.
resolve defines how to resolve our depedencies when we use import and require statements in our source files. Here we can define shortcuts such as auto resolve extensions and defining a base directory (~) to avoid needing to use long relative paths.
The remaining options involve adding Loaders and Plugins.
Loaders
The first step of the pipeline are the loaders. Loaders define how a file should be read, they essentially take arbritrary input as text and resolve to JavaScript as text. So, for example, a text file can be wrapped in double quotes to become Javascript strings.
The structure of a loader configuration is as follows:
|
|
We’ll be using the following loaders:
babel-loader
The babel-loader can take our JavaScript and JSX files and transpile it into browser-compatible JavaScript using Babel.
|
|
|
|
json-loader
The json-loader converts JSON into a JavaScript object. The simplicity of this loader makes it a good example of what a loader is doing. Check out its source code.
|
|
|
|
style-loader
The style-loader itself isn’t very useful. It needs to be given a string of CSS in order to inject it into the DOM as a <style> tag. We can do this using an ordered array of loaders as you’ll see for the css-loader and sass-loader.
|
|
css-loader
The css-loader converts CSS into a JavaScript String. The root is used to resolve asset dependencies like images.
|
|
|
|
sass-loader
The sass-loader compiles SASS into CSS.
|
|
|
|
file-loader
The file-loader will copy over a required asset into the build under the given name option and resolve to a string pointing to the path the asset’s been placed.
|
|
|
|
Plugins
HtmlWebpackPlugin
The HtmlWebpackPlugin takes an EJS template and generates a HTML file which will inject our entry files as <script> tags as part of the build in the <body>.
|
|
|
|
The index.html.ejs is placed in our sourceRoot and should look something like:
|
|
Environment-specific Configurations
We’ll want to change some of the configuration based on the environment we’re running on. For example, our production build should be minified to reduce data usage.
First, we’ll need a way to toggle between environments. The most common way to do so in NodeJS apps is to use the NODE_ENV environment variable which we can use in our Webpack config using the process.env.NODE_ENV variable.
Try making the environment toggle yourself. An implementation is also provided in the project template.
Development Configuration
For development we can set the devtool to inline-source-map so that we can load the source mappings between our source code and bundled code in a single request.
We can also set up the devServer so that it knows where to find our bundled files and reduce the amount of logging it outputs.
|
|
Dev Server
To use the Dev Server we’ll need to install it.
|
|
The Dev Server is useful for automatically watching for file changes and rebuilding the project. It also keeps the build in-memory and doesn’t write anything to disk; making the development cycle a lot faster.
Production Configuration
For production we can minify the bundle using UglifyJsPlugin. Since we want to do this after the common plugins, we can put it under a custom postPlugins property and concatenate them in the final configuration.
We can also set the devtool to nosource-source-map so that we can see line number mappings but not expose the source code to the public internet.
So that we don’t end up building an invalid bundle, we can set the build to bail as soon as there’s an error.
|
|
DefinePlugin
Some JavaScript libraries also use NODE_ENV to toggle the amount of logging they do. However, since the NODE_ENV is only available in the NodeJS environment and not the browser, we’ll need to resolve this variable in our source files as part of the build. We can do this using the DefinePlugin which essentially does a string-replace.
|
|
Running the Build
Now that we’ve got our webpack.config.js set up, we can run the build. There are multiple ways to build a project.
Note: If you’re using Windows, you’ll want to install
cross-envand prefix your commands with it so that you can provide environment variables in a uniform way.
Building for Development
We can run the Dev Server while developing.
|
|
This will start a HTTP server on http://localhost:8080/ as defined in our webpack.config.js.
Building for Production
Just run Webpack!
|
|
Using npm to run commands
We can alias commands using npm. Add the following to your package.json.
|
|
Now you can just run the appropriate alias.
|
|
You don’t need the ./node_modules/.bin/ prefix as npm resolves it for you.
Conclusion
You should now have a project directory which looks something like:
|
|